前端速通 ES6
ECMAScript(ES) 是规范、 JavaScript 是 ES 的实现
ES6 的第一个版本 在 2015 年 6 月发布,正式名称是《ECMAScript 2015 标准》(简称 ES2015)
ES6 指是 5.1 版以后的 JavaScript 的下一代标准,涵盖了 ES2015、ES2016、ES2017 等等
let 推荐使用let关键字替代 var关键字声明变量,因为 var存在诸多问题,比如:
越域 1 2 3 4 5 6 { var a = 1 ; let b = 2 ; } console .log (a); console .log (b);
重复声明 1 2 3 4 5 6 7 8 var m = 1 var m = 2 let n = 3 console .log (m) console .log (n)
变量提升 1 2 3 4 5 6 console .log (x); var x = 10 ;console .log (y); let y = 20 ;
const 解构 数组解构 1 2 3 4 5 let arr = [1 , 2 , 3 ];const [x, y, z] = arr;console .log (x, y, z);
对象解构 1 2 3 4 5 6 7 8 9 10 11 12 13 14 15 16 17 18 19 20 const person = { name : "jack" , age : 21 , language : ['java' , 'js' , 'css' ] } const {name, age, language} = person;console .log (name);console .log (age);console .log (language);const {name : nn, age, language} = person;console .log (nn);console .log (age);console .log (language);
链判断 如果读取对象内部的某个属性,往往需要判断一下,属性的上层对象是否存在。
比如,读取message.body.user.firstName这个属性,安全的写法是写成下面这样。
1 2 3 4 5 6 7 8 9 10 let message = null ;const firstName = message.body .user .firstName || 'default' ;const firstName = (message && message.body && message.body .user && message.body .user .firstName ) || 'default' ; console .log (firstName)
这段代码的目的是从message对象中获取firstName属性,如果无法获取到该属性或者message对象本身为null,则使用默认值default。
错误的写法是直接尝试访问message.body.user.firstName,这会导致在message或message.body或message.body.user为null时抛出错误。
正确的写法使用了短路运算符&&来确保只有在所有条件都满足的情况下才尝试访问firstName属性。如果任何一个条件不满足,整个表达式的结果将为false,从而使得||后面的默认值'default'被赋值给firstName。
这样的层层判断非常麻烦,因此 ES2020 引入了“链判断运算符”(optional chaining operator)?. ,简化上面的写法。
1 const firstName = message?.body ?.user ?.firstName || 'default' ;
参数默认值 1 2 3 4 5 6 7 8 9 10 11 12 13 14 15 16 function add (a, b ) { b = b || 1 ; return a + b; } console .log (add (10 ));function add2 (a, b = 1 ) { return a + b; } console .log (add2 (10 ));
箭头函数 1 2 3 4 5 6 7 8 let print = obj => console .log (obj);print (100 );
1 2 3 4 5 6 7 8 9 10 11 12 13 14 15 16 let sum = function (a, b ) { return a + b; } let sum2 = (a, b ) => a + b;console .log (sum2 (10 , 10 ));let sum3 = (a, b ) => { c = a + b; return c; }; console .log (sum3 (10 , 20 ));
模板字符串 1 2 3 4 5 6 let info = "你好,我的名字是:【" +name+"】,年龄是:【" +age+"】,邮箱是:【】" console .log (info);# 模板字符串的写法 let info = `你好,我的名字是:${name} ,年龄是:${person.age} ,邮箱是:${person.email} ` console .log (info);
Promise 代表 异步对象,类似Java中的 CompletableFuture
Promise 是现代 JavaScript 中异步编程的基础,是一个由异步函数返回的可以向我们指示当前操作所处的状态的对象。在 Promise 返回给调用者的时候,操作往往还没有完成,但 Promise 对象可以让我们操作最终完成时对其进行处理(无论成功还是失败)
fetch 是浏览器支持从远程获取数据的一个函数,这个函数返回的就是 Promise 对象
1 2 3 4 5 6 7 8 9 10 11 const fetchPromise = fetch ( "https://mdn.github.io/learning-area/javascript/apis/fetching-data/can-store/products.json" ); console .log (fetchPromise);fetchPromise.then ((response ) => { console .log (`已收到响应:${response.status} ` ); }); console .log ("已发送请求……" );
fetch api fetch 是浏览器支持从远程获取数据的一个函数,这个函数返回的就是 Promise 对象
1 2 3 4 5 6 7 8 9 10 11 const fetchPromise = fetch ( "https://mdn.github.io/learning-area/javascript/apis/fetching-data/can-store/products.json" , ); console .log (fetchPromise);fetchPromise.then ((response ) => { console .log (`已收到响应:${response.status} ` ); }); console .log ("已发送请求……" );
通过 fetch() API 得到一个 Response 对象;
response.status : 读取响应状态码response.json() :读取响应体json数据;(这也是个异步对象 )
1 2 3 4 5 6 7 8 9 10 const fetchPromise = fetch ( "https://mdn.github.io/learning-area/javascript/apis/fetching-data/can-store/products.json" , ); fetchPromise.then ((response ) => { const jsonPromise = response.json (); jsonPromise.then ((json ) => { console .log (json[0 ].name ); }); });
fetchPromise是一个Promise对象,它代表了一个异步操作(即发起HTTP请求)。当HTTP请求完成时,fetchPromise的状态变为已解析(resolved),并且它的解析值是服务器响应的对象,即response。
response对象有一个名为json()的方法,该方法返回一个新的Promise对象,该对象解析为JSON格式的数据。当jsonPromise解析完成时,它的解析值是JSON数据,即json。
最后,我们通过访问json[0].name来获取第一个产品的名称,并将其打印到控制台。
Promise状态 首先,Promise 有三种状态:
待定(pending) :初始状态,既没有被兑现,也没有被拒绝。这是调用 fetch() 返回 Promise 时的状态,此时请求还在进行中。已兑现(fulfilled) :意味着操作成功完成。当 Promise 完成时,它的 then() 处理函数被调用。已拒绝(rejected) :意味着操作失败。当一个 Promise 失败时,它的 catch() 处理函数被调用。
Async 函数 async function 声明创建一个绑定到给定名称的新异步函数。函数体内允许使用 await 关键字,这使得我们可以更简洁地编写基于 promise 的异步代码 ,并且避免了显式地配置 promise 链 的需要。
async 函数是使用async关键字声明的函数。async 函数是 AsyncFunction 构造函数的实例,并且其中允许使用 await 关键字。async 和 await 关键字让我们可以用一种更简洁的方式写出基于 Promise 的异步行为,而无需刻意地链式调用 promise。async 函数 返回的还是 Promise对象
1 2 3 4 async function myFunction ( }
在异步函数中,你可以在调用一个返回 Promise 的函数之前使用 await 关键字。这使得代码在该点上等待,直到 Promise 被完成,这时 Promise 的响应被当作返回值,或者被拒绝的响应被作为错误抛出。
1 2 3 4 5 6 7 8 9 10 11 12 13 14 15 16 17 18 19 20 async function fetchProducts ( try { const response = await fetch ( "https://mdn.github.io/learning-area/javascript/apis/fetching-data/can-store/products.json" , ); if (!response.ok ) { throw new Error (`HTTP 请求错误:${response.status} ` ); } const json = await response.json (); console .log (json[0 ].name ); } catch (error) { console .error (`无法获取产品列表:${error} ` ); } } fetchProducts ();
模块化 将 JavaScript 程序拆分为可按需导入的单独模块 的机制。Node.js 已经提供这个能力很长时间了,还有很多的 JavaScript 库和框架已经开始了模块的使用(例如,CommonJS 和基于 AMD 的其他模块系统 如 RequireJS ,以及最新的 Webpack 和 Babel )。
好消息是,最新的浏览器开始原生支持模块功能了。
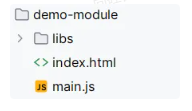
工程架构
index.html 1 2 3 4 5 6 7 8 9 10 11 <!DOCTYPE html > <html lang ="en" > <head > <meta charset ="UTF-8" > <title > Title</title > <script src ="main.js" type ="module" /> </head > <body > <h1 > 模块化测试</h1 > </body > </html >
user.js 放在 libs/user.js
1 2 3 4 5 6 7 8 9 10 11 12 13 14 15 16 17 18 19 20 21 22 23 24 25 const user = { username : "张三" , age : 18 } const isAdult = (age )=>{ if (age > 18 ){ console .log ("成年人" ) }else { console .log ("未成年" ) } } export {user,isAdult}
main.js 1 2 3 4 5 6 7 import {user,isAdult} from './libs/user.js' alert ("当前用户:" +user.username )isAdult (user.age );
npm npm 是 nodejs 中进行 包管理 的工具;
下载:https://nodejs.org/en
环境 安装Node.js
配置 npm
1 2 npm config set registry https://registry.npmmirror.com npm config get registry
命令
npm init: 项目初始化;
npm init -y:默认一路yes,不用挨个输入信息
npm install 包名:安装js包到项目中(仅当前项目有效)。指定 包名 ,或者 包名@版本号
npm install -g: 全局安装,所有都能用
npm update 包名:升级包到最新版本
npm uninstall 包名:卸载包
npm run:项目运行
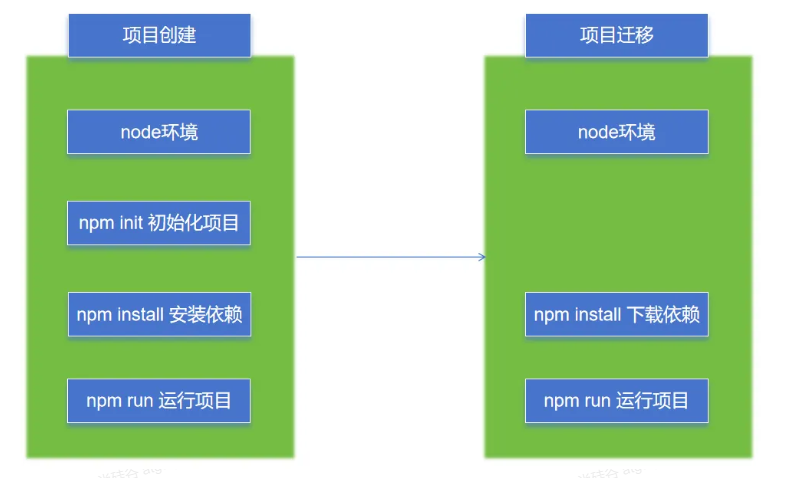
使用流程 Java:
项目创建:Java环境 ==》 maven 初始化 ==》 添加依赖 ==》运行项目
项目迁移:Java环境 ==》 maven 下载依赖 ==》运行项目
Vite 官网:https://cn.vitejs.dev
实战 创建项目 1 npm create vite #根据向导选择技术栈
安装依赖 三种方式
1 2 3 4 npm install #安装项目所有依赖 npm install axios #安装指定依赖到当前项目 npm install -g xxx # 全局安装
项目启动 项目打包 项目部署
前后分离方式:需要把 dist 文件夹内容部署到如 nginx 之类的服务器上。
前后不分离方式:把 dist 文件夹内容复制到 SpringBoot 项目 resources 下面
Vue3 我们使用 vite 创建 vue项目脚手架,并测试Vue功能
组件化 组件系统是一个抽象的概念;
组件:小型、独立、可复用的单元
组合:通过组件之间的组合、包含关系构建出一个完整应用
几乎任意类型的应用界面都可以抽象为一个组件树;
SFC Vue 的单文件组件 (即 .vue 文件,英文 Single-File Component,简称 *SFC ) 是一种特殊的文件格式,使我们能够将一个 Vue 组件的模板、逻辑与样式封装在单个文件中.
1 2 3 4 5 6 7 8 9 10 11 <script setup> </script> <template > //编写页面模板 </template > <style scoped > //编写样式 </style >
Vue工程 创建&运行 1 2 npm create vite npm run dev
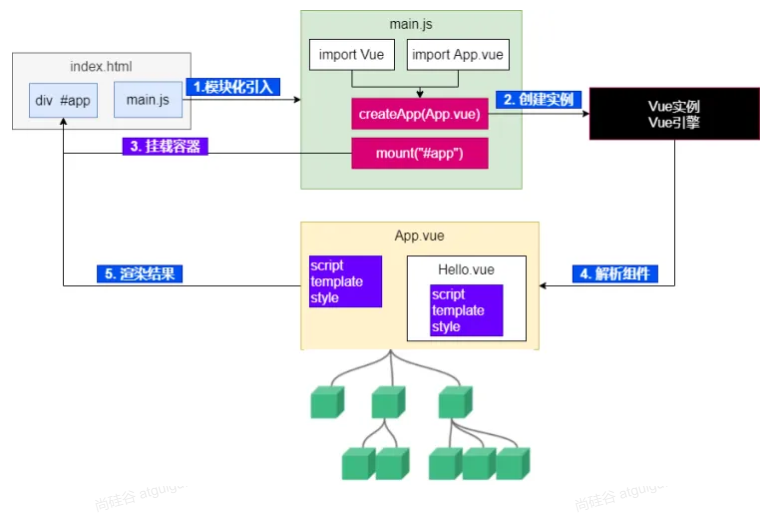
运行原理
基础使用 插值 1 2 3 4 5 6 7 8 9 10 11 12 13 14 15 16 17 18 19 20 21 22 23 24 <script setup> //基本数据 let name = "张三" let age = 18 //对象数据 let car = { brand: "奔驰", price: 777 } </script> <template> <p> name: {{name}} </p> <p> age: {{age}} </p> <div style="border: 3px solid red"> <p>品牌:{{car.brand}}</p> <p>价格:{{car.price}}</p> </div> </template> <style scoped> </style>
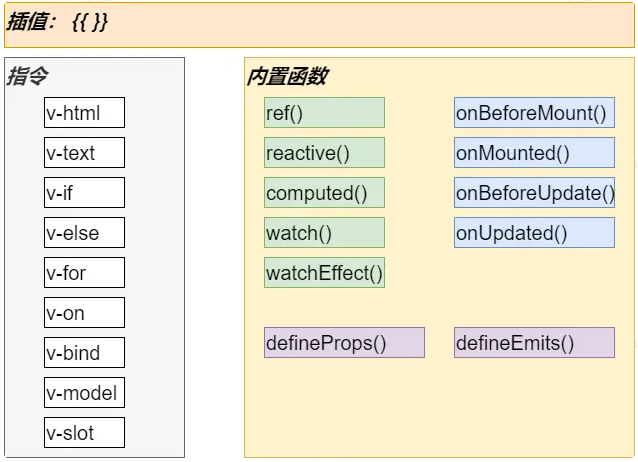
指令 v-on事件绑定 使用 v-on指令,可以为元素绑定事件。可以简写为 @
1 2 3 4 5 6 7 8 9 10 11 12 <script setup> //定义事件回调 function buy(){ alert("购买成功"); } </script> <template> <button v-on:click="buy">购买</button> <button @click="buy">购买</button> </template> <style scoped> </style>
更多指令:https://cn.vuejs.org/api/built-in-directives.html;后期我们都会用到。
v-bind 属性绑定
使用 v-bind:属性='xx'语法,可以为标签的某个属性绑定值;
可以简写为 :属性='xx'
1 2 3 4 5 6 7 8 9 10 11 12 13 <script setup> // let url = "http://www.baidu.com" </script> <template> <a v-bind:href="url">go</a> <a :href="url">go</a> </template> <style scoped> </style>
响应式 -ref() 数据的动态变化需要反馈到页面;
Vue通过ref()和reactive()包装数据,将会生成一个数据的代理对象。vue内部的 基于依赖追踪的响应式系统 就会追踪 感知数据变化 ,并触发页面 的重新渲染 。
使用步骤:
使用 ref() 包装原始类型、对象类型数据 ,生成 代理对象
任何方法、js代码中 ,使用 代理对象.value 的形式读取和修改值页面组件中 ,直接使用 代理对象
注意: 推荐使用 const(常量) 声明代理对象。代表代理对象不可变,但是内部值变化会被追踪。*
1 2 3 4 5 6 7 8 9 10 11 12 13 14 15 <script setup> import { ref } from 'vue' const count = ref(0) function increment() { count.value++ } </script> <template> <button @click="increment"> {{ count }} </button> </template>
深层响应性
1 2 3 4 5 6 7 8 9 10 11 12 import { ref } from 'vue' const obj = ref({ nested: { count: 0 }, arr: ['foo', 'bar'] }) function mutateDeeply() { // 以下都会按照期望工作 obj.value.nested.count++ obj.value.arr.push('baz') }
响应式-reactive() 使用步骤:
使用 reactive() 包装对象类型数据 ,生成 代理对象
任何方法、js代码中 ,使用 代理对象.属性的形式读取和修改值页面组件中 ,直接使用 代理对象.属性
1 2 3 4 5 6 7 import { reactive } from 'vue' const state = reactive({ count: 0 }) <button @click="state.count++"> {{ state.count }} </button>
基本类型用 ref(),对象类型用 reactive(),ref 要用 .value,reactive直接 .。页面取值永不变。
也可以 ref 一把梭,大不了 天天 .value
表单绑定 1 2 3 4 5 6 7 8 9 10 11 12 13 14 15 16 17 18 19 20 21 22 23 24 25 26 27 28 29 30 31 32 33 34 35 36 37 38 39 40 41 42 43 44 45 46 47 48 49 50 51 52 53 54 55 56 57 58 59 60 61 62 <div style ="display: flex;" > <div style ="border: 1px solid black;width: 300px" > <form > <h1 > 表单绑定</h1 > <p style ="background-color: azure" > <label > 姓名(文本框):</label > <input /> </p > <p style ="background-color: azure" > <label > 同意协议(checkbox):</label > <input type ="checkbox" /> </p > <p style ="background-color: azure" > <label > 兴趣(多选框):</label > <br /> <label > <input type ="checkbox" value ="足球" /> 足球</label > <label > <input type ="checkbox" value ="篮球" /> 篮球</label > <label > <input type ="checkbox" value ="羽毛球" /> 羽毛球</label > <label > <input type ="checkbox" value ="乒乓球" /> 乒乓球</label > </p > <p style ="background-color: azure" > <label > 性别(单选框):</label > <label > <input type ="radio" name ="sex" value ="男" > 男</label > <label > <input type ="radio" name ="sex" value ="女" > 女</label > </p > <p style ="background-color: azure" > <label > 学历(单选下拉列表):</label > <select > <option disabled value ="" > 选择学历</option > <option > 小学</option > <option > 初中</option > <option > 高中</option > <option > 大学</option > </select > </p > <p style ="background-color: azure" > <label > 课程(多选下拉列表):</label > <br /> <select multiple > <option disabled value ="" > 选择课程</option > <option > 语文</option > <option > 数学</option > <option > 英语</option > <option > 道法</option > </select > </p > </form > </div > <div style ="border: 1px solid blue;width: 200px" > <h1 > 结果预览</h1 > <p style ="background-color: azure" > <label > 姓名:</label > </p > <p style ="background-color: azure" > <label > 同意协议:</label > </p > <p style ="background-color: azure" > <label > 兴趣:</label > </p > <p style ="background-color: azure" > <label > 性别:</label > </p > <p style ="background-color: azure" > <label > 学历:</label > </p > <p style ="background-color: azure" > <label > 课程:</label > </p > </div > </div >
计算属性 - computed 计算属性:根据已有数据计算出新数据
1 2 3 4 5 6 7 8 9 10 11 12 13 14 15 16 17 18 19 20 21 22 23 24 25 26 27 <script setup> import {computed, reactive, toRef, toRefs} from "vue"; //省略基础代码 const totalPrice = computed(()=>{ return price.value * num.value - coupon.value*100 }) </script> <template> <div class="car"> <h2>优惠券:{{ car.coupon }} 张</h2> <h2>数量:{{ car.num }}</h2> <h2>单价:{{ car.price }}</h2> <h1>总价:{{totalPrice}}</h1> <button @click="getCoupon">获取优惠</button> <button @click="addNum">加量</button> <button @click="changePrice">加价</button> </div> </template> <style scoped> </style>
进阶用法 监听 - watch 1 2 3 4 5 6 watch (num, (value, oldValue, onCleanup ) => { console .log ("newValue:" + value + ";oldValue:" + oldValue) onCleanup (() => { console .log ("onCleanup...." ) }) })
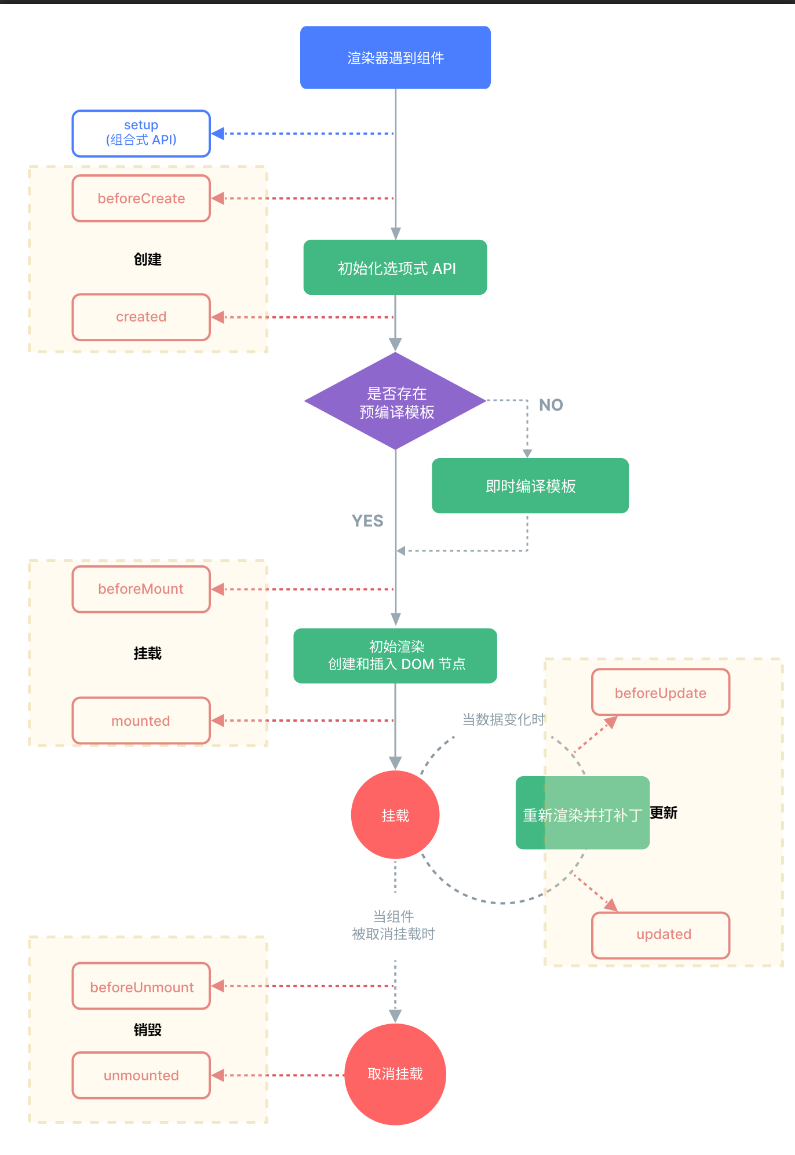
生命周期 每个 Vue 组件实例在创建时都需要经历一系列的初始化步骤,比如设置好数据侦听,编译模板,挂载实例到 DOM,以及在数据改变时更新 DOM。在此过程中,它也会运行被称为生命周期钩子的函数,让开发者有机会在特定阶段运行自己的代码。
生命周期整体分为四个阶段,分别是:创建、挂载、更新、销毁,每个阶段都有两个钩子,一前一后。
常用的钩子:
onMounted(挂载完毕) onUpdated(更新完毕) onBeforeUnmount(卸载之前)
1 2 3 4 5 6 7 8 9 10 11 12 13 14 15 16 17 18 19 20 21 22 23 24 25 26 27 <script setup> import {onBeforeMount, onBeforeUpdate, onMounted, onUpdated, ref} from "vue"; const count = ref(0) const btn01 = ref() // 生命周期钩子 onBeforeMount(()=>{ console.log('挂载之前',count.value,document.getElementById("btn01")) }) onMounted(()=>{ console.log('挂载完毕',count.value,document.getElementById("btn01")) }) onBeforeUpdate(()=>{ console.log('更新之前',count.value,btn01.value.innerHTML) }) onUpdated(()=>{ console.log('更新完毕',count.value,btn01.value.innerHTML) }) </script> <template> <button ref="btn01" @click="count++"> {{count}} </button> </template> <style scoped> </style>
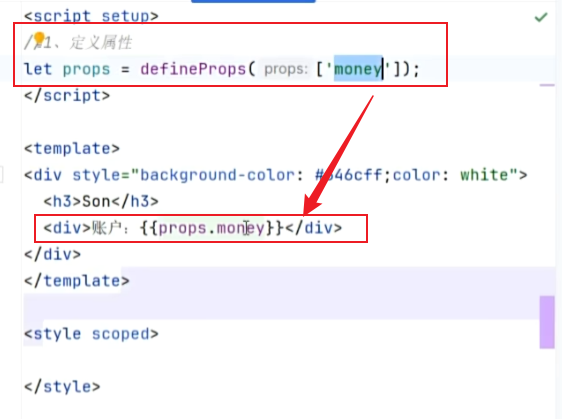
组件传值 父传子 -Props 父组件给子组件传递值;
父组件
子组件
单向数据流 效果:
父组件修改值,子组件发生变化
子组件修改值,父组件不会感知到
1 2 3 4 5 6 7 8 9 10 11 12 <Son :books="data.books" :money="data.money" /> let props = defineProps ({ money : { type : Number , required : true , default : 200 }, books : Array });
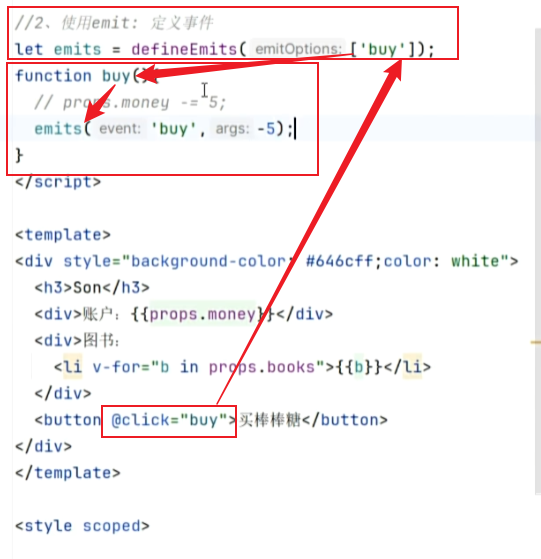
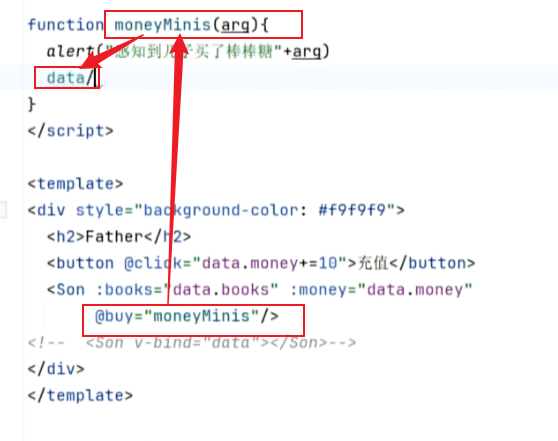
子传父 -Emit 子组件
父组件
props 用来父传子,emit 用来子传父
1 2 3 4 5 6 7 8 9 10 let emits = defineEmits (['buy' ]);function buy ( emits ('buy' ,-5 ); } <Son :books="data.books" :money="data.money" @buy="moneyMinis" />
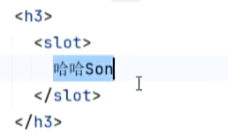
插槽 -Slots 子组件可以使用插槽接受模板内容。这个也是传值的一种方式,父组件向子组件不是传值而是传递页面模板就用插槽
基本使用 父组件
子组件
1 2 3 4 5 6 7 8 9 <button class ="fancy-btn" > <slot > </slot > </button > <FancyButton > Click me! </FancyButton >
默认内容 1 2 3 4 5 <button type ="submit" > <slot > Submit </slot > </button >
具名插槽 定义
1 2 3 4 5 6 7 8 9 10 11 <div class ="container" > <header > <slot name ="header" > </slot > </header > <main > <slot > </slot > </main > <footer > <slot name ="footer" > </slot > </footer > </div >
使用: v-slot可以简写为 #
1 2 3 4 5 6 <BaseLayout > <!--父组件定义传给的插槽是哪个--> <template v-slot:header > </template > </BaseLayout >
几个简写:
v-on=@v-bind= :v-slot= #
Vue-Router 理解路由
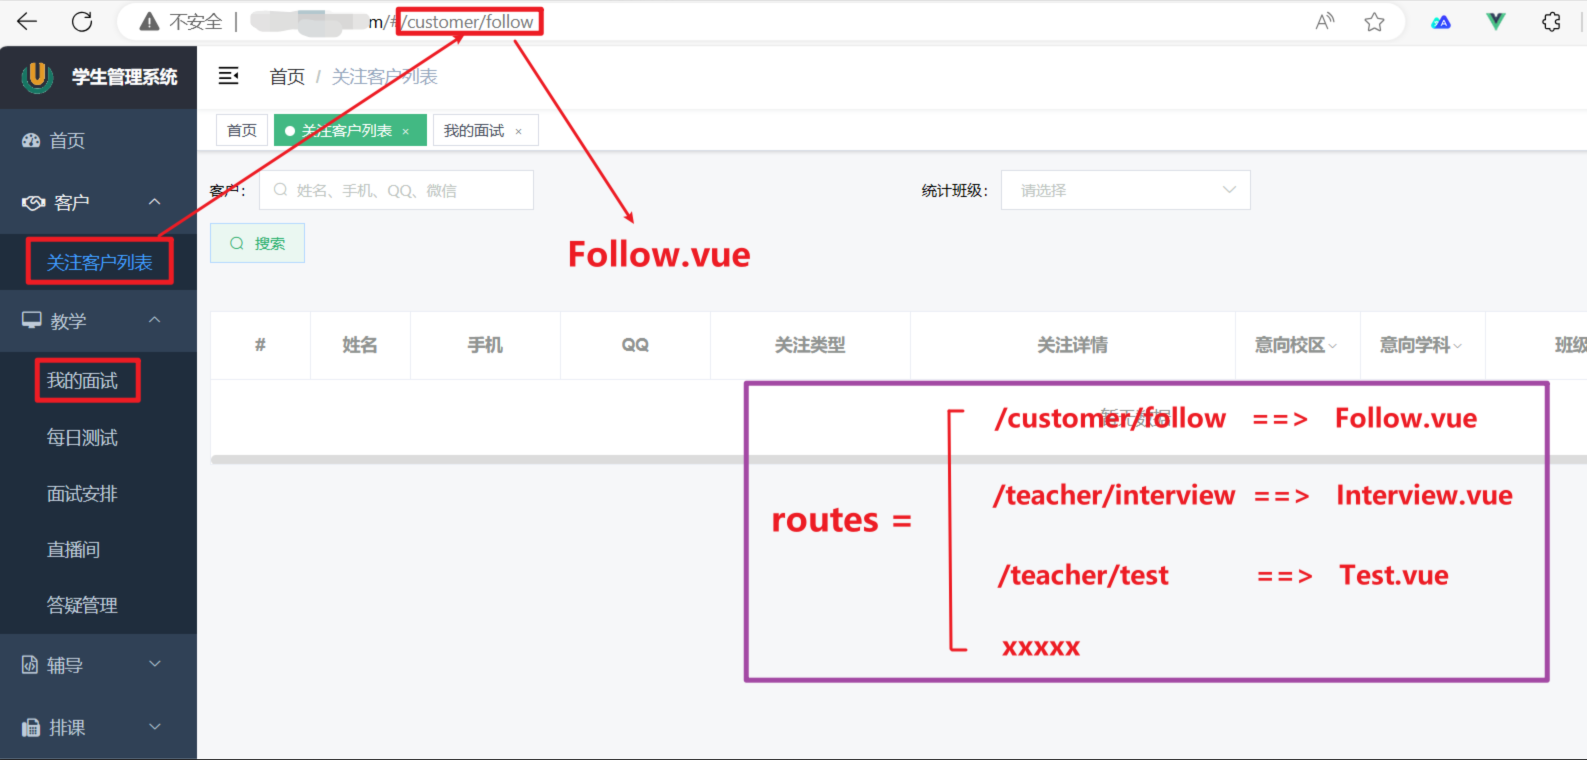
前端系统根据页面路径,跳转到指定组件,展示出指定效果
首先新建个项目
然后open in terminal
然后把项目里的app.vue里的template清空,以及components里面的组件也删掉了
然后写一些html
1 2 3 4 5 6 7 8 9 10 11 12 13 14 <script setup> </script> <template> <a href="/">首页</a> <a href="/hello">hello</a> <a href="/about">关于</a> </template> <style scoped> </style>
然后创建views文件夹来创建一些页面
然后想要整合Vue-Router先要安装依赖
1 npm install vue-router@4
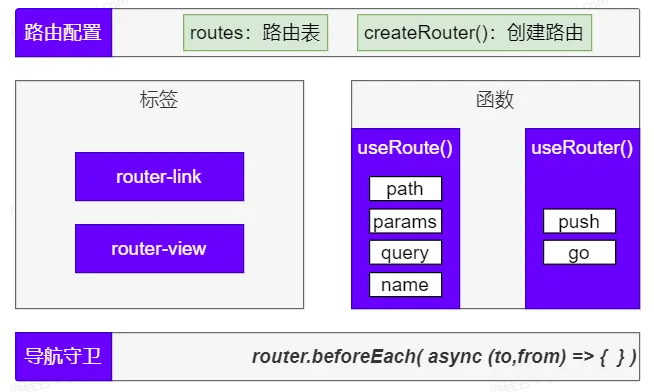
然后进行路由配置
参考:入门 | Vue Router (vuejs.org)
编写一个新的组件,测试路由功能;步骤如下:
编写 router/index.js文件
配置路由表信息
创建路由器并导出
1 2 3 4 5 6 7 8 9 10 11 12 13 14 15 16 17 18 19 20 21 import Home from '../views/Home.vue' import About from '../views/About.vue' import {createMemoryHistory, createRouter} from 'vue-router' const routes = [ {path : '/' , component : Home }, {path : '/about' , component : About }, {path : '/hello' , component : () => import ('../views/Hello.vue' )} ] const router = createRouter ({ history : createMemoryHistory (), routes : routes }); export default router;
在 main.js中使用路由
1 2 3 4 5 6 7 8 9 import {createApp} from 'vue' import './style.css' import App from './App.vue' import router from "./router/index.js" ;let app = createApp (App ); app.use (router) app.mount ('#app' );
在页面使用router-link``router-view完成路由功能
1 2 3 4 5 6 7 8 9 10 11 12 13 14 15 16 17 18 19 <script setup> </script> <template> <!-- <a href="/">首页</a> <a href="/hello">hello</a> <a href="/about">关于</a>--> <router-link to="/">首页</router-link> <router-link to="/hello">hello</router-link> <router-link to="/about">关于</router-link> <hr/> <router-view></router-view> </template> <style scoped> </style>
路径参数 使用 :变量名接受动态参数;这个成为 路径参数
1 2 3 4 5 6 const routes = [ { path : '/o/:orderId' }, { path : '/p/:productName' }, ]
嵌套路由
1 2 3 4 5 6 7 8 9 10 11 12 13 14 15 16 17 18 19 20 const routes = [ { path : '/user/:id' , component : User , children : [ { path : 'profile' , component : UserProfile , }, { path : 'posts' , component : UserPosts , }, ], }, ]
编程式路由 userRoute:路由数据 路由传参跳转到指定页面后,页面需要取到传递过来的值,可以使用 useRoute方法;
拿到当前页路由数据;可以做
获取到当前路径
获取到组件名
获取到参数
获取到查询字符串
1 2 3 4 5 6 import {useRoute} from 'vue-router' const route = useRoute ()console .log (route.query )console .log (route.params )
useRouter:路由器 1 2 3 4 5 6 7 8 9 10 11 12 13 14 15 16 17 18 19 20 21 import {useRoute, useRouter} from "vue-router" ;const router = useRouter ();router.push ('/users/eduardo' ) router.push ({ path : '/users/eduardo' }) router.push ({ name : 'user' , params : { username : 'eduardo' } }) router.push ({ path : '/register' , query : { plan : 'private' } }) router.push ({ path : '/about' , hash : '#team' }) router.push ({ path : '/user' , params : { username } })
路由传参 params 参数 1 2 3 4 5 6 7 8 9 10 11 12 13 14 15 16 <RouterLink :to ="`/news/detail/001/新闻001/内容001`" > {{news.title}}</RouterLink > <RouterLink :to ="{ name:'xiang', //用name跳转,params情况下,不可用path params:{ id:news.id, title:news.title, content:news.title } }" > {{news.title}} </RouterLink >
query 参数 1 2 3 4 5 6 7 8 9 10 11 12 13 14 15 16 17 18 19 <router-link to ="/news/detail?a=1&b=2&content=欢迎你" > 跳转 </router-link > <RouterLink :to ="{ //name:'xiang', //用name也可以跳转 path:'/news/detail', query:{ id:news.id, title:news.title, content:news.content } }" > {{news.title}} </RouterLink >
导航守卫 是一种拦截器思想
我们只演示全局前置守卫。后置钩子等内容参照官方文档
1 2 3 4 5 6 7 8 9 10 11 12 13 14 15 16 17 18 19 20 21 22 23 24 25 26 27 28 29 30 31 32 33 34 35 36 37 38 39 40 41 42 43 44 45 46 import {createRouter, createWebHistory} from 'vue-router' import HomeView from '../views/HomeView.vue' const router = createRouter ({ history : createWebHistory (import .meta .env .BASE_URL ), routes : [ { path : '/' , name : 'home' , component : HomeView }, { path : '/about' , name : 'about' , component : () => import ('../views/AboutView.vue' ) }, { path : '/user/:name' , name : 'User' , component : () => import ('@/views/user/UserInfo.vue' ), children : [ { path : 'profile' , component : () => import ('@/views/user/Profile.vue' ) }, { path : 'posts' , component : () => import ('@/views/user/Posts.vue' ) } ] } ] }) router.beforeEach (async (to, from ) => { console .log ("守卫:to:" , to) console .log ("守卫:from:" , from ) if (to.fullPath === '/about' ) { return "/" } }) export default router
Axios 简介 Axios 是一个基于 promise 的网络请求库,可以用于浏览器和 node.js
1 2 3 import axios from "axios" axios.get ('/user' ) .then (res =>console .log (resp.data ))
请求 get请求 1 2 3 4 5 6 7 8 9 10 11 12 13 axios.get ('/user?ID=12345' ) .then (function (response ) { console .log (response); }) .catch (function (error ) { console .log (error); }) .finally (function ( });
携带请求参数
1 2 3 4 5 6 7 8 9 10 11 12 13 14 15 axios.get ('/user' , { params : { ID : 12345 } }) .then (function (response ) { console .log (response); }) .catch (function (error ) { console .log (error); }) .finally (function ( });
post请求 默认post请求体中的数据将会以json方式提交
1 2 3 4 5 6 7 8 9 10 axios.post ('/user' , { firstName : 'Fred' , lastName : 'Flintstone' }) .then (function (response ) { console .log (response); }) .catch (function (error ) { console .log (error); });
响应结果 响应的数据结构如下:
1 2 3 4 5 6 7 8 9 10 11 12 13 14 15 16 17 18 19 20 21 22 23 { data : {}, status : 200 , statusText : 'OK' , headers : {}, config : {}, request : {} }
使用 配置 这样就不用每次都写完整路径了
1 2 3 4 5 6 7 8 9 10 11 12 13 14 15 16 17 18 19 20 21 22 23 24 25 26 27 28 29 30 31 32 33 34 35 36 37 38 39 40 41 42 43 44 45 46 47 48 49 50 51 52 53 54 55 56 57 58 59 60 61 62 63 64 65 66 67 68 69 70 71 72 73 74 75 76 77 78 79 80 81 82 83 84 85 86 87 88 89 90 91 92 93 94 95 96 97 98 99 100 101 102 103 104 105 106 107 108 109 110 111 112 113 114 115 116 117 118 119 120 121 122 123 124 125 126 127 128 129 130 131 132 133 134 135 136 137 138 139 140 141 142 143 144 145 146 147 148 149 150 151 152 153 154 155 156 157 158 159 160 161 162 163 164 165 166 167 168 const instance = axios.create ({ baseURL : 'https://some-domain.com/api/' , timeout : 1000 , headers : {'X-Custom-Header' : 'foobar' } }); { url : '/user' , method : 'get' , baseURL : 'https://some-domain.com/api/' , transformRequest : [function (data, headers ) { return data; }], transformResponse : [function (data ) { return data; }], headers : {'X-Requested-With' : 'XMLHttpRequest' }, params : { ID : 12345 }, paramsSerializer : function (params ) { return Qs .stringify (params, {arrayFormat : 'brackets' }) }, data : { firstName : 'Fred' }, data : 'Country=Brasil&City=Belo Horizonte' , timeout : 1000 , withCredentials : false , adapter : function (config ) { }, auth : { username : 'janedoe' , password : 's00pers3cret' }, responseType : 'json' , responseEncoding : 'utf8' , xsrfCookieName : 'XSRF-TOKEN' , xsrfHeaderName : 'X-XSRF-TOKEN' , onUploadProgress : function (progressEvent ) { }, onDownloadProgress : function (progressEvent ) { }, maxContentLength : 2000 , maxBodyLength : 2000 , validateStatus : function (status ) { return status >= 200 && status < 300 ; }, maxRedirects : 5 , socketPath : null , httpAgent : new http.Agent ({ keepAlive : true }), httpsAgent : new https.Agent ({ keepAlive : true }), proxy : { protocol : 'https' , host : '127.0.0.1' , port : 9000 , auth : { username : 'mikeymike' , password : 'rapunz3l' } }, cancelToken : new CancelToken (function (cancel ) { }), decompress : true }
新建个utils文件夹,然后用http里面的index.js
拦截器 1 2 3 4 5 6 7 8 9 10 11 12 13 14 15 16 17 18 19 axios.interceptors .request .use (function (config ) { return config; }, function (error ) { return Promise .reject (error); }); axios.interceptors .response .use (function (response ) { return response; }, function (error ) { return Promise .reject (error); });
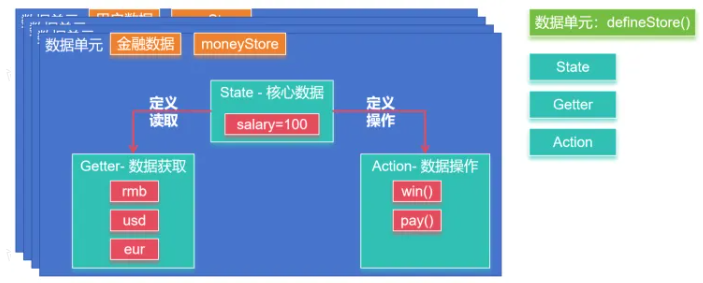
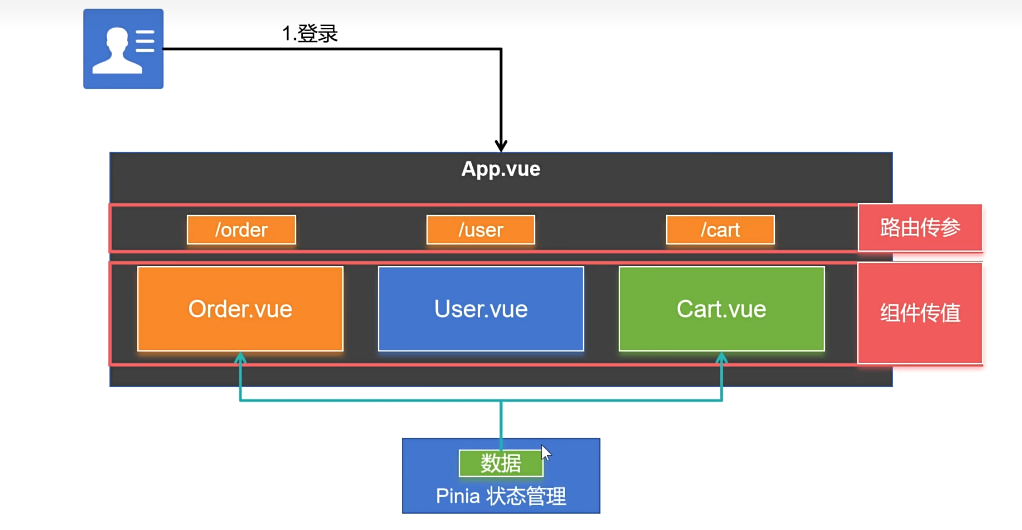
Pinia Pinia 是 Vue 的存储库 ,它允许您跨组件/页面共享状态 。
Pinia 三个核心概念:
State:表示 Pinia Store 内部保存的数据(data)
Getter:可以认为是 Store 里面数据的计算属性(computed)
Actions:是暴露修改数据的几种方式。
虽然外部也可以直接读写Pinia Store 中保存的data,但是我们建议使用Actions暴露的方法操作数据更加安全
整合 main.js
1 2 3 4 5 6 7 8 9 10 import { createApp } from 'vue' import './style.css' import App from './App.vue' import {createPinia} from 'pinia' const pinia = createPinia ();createApp (App ) .use (pinia) .mount ('#app' )
案例 stores/money.js编写内容
1 2 3 4 5 6 7 8 9 10 11 12 13 14 15 16 17 18 19 import {defineStore} from 'pinia' export const useMoneyStore = defineStore ('money' , { state : () => ({money : 100 }), getters : { rmb : (state ) => state.money , usd : (state ) => state.money * 0.14 , eur : (state ) => state.money * 0.13 , }, actions : { win (arg ) { this .money +=arg; }, pay (arg ){ this .money -= arg; } }, });
App.vue
1 2 3 4 5 6 7 8 9 10 11 12 13 14 <script setup> import Wallet from "./components/Wallet.vue"; import Game from "./components/Game.vue"; </script> <template> <Wallet></Wallet> <Game/> </template> <style scoped> </style>
Wallet.vue
1 2 3 4 5 6 7 8 9 10 11 12 13 14 15 16 17 18 19 <script setup> import {useMoneyStore} from '../stores/money.js' let moneyStore = useMoneyStore(); </script> <template> <div> <h2>¥:{{moneyStore.rmb}}</h2> <h2>$:{{moneyStore.usd}}</h2> <h2>€:{{moneyStore.eur}}</h2> </div> </template> <style scoped> div { background-color: #f9f9f9; } </style>
Game.vue
1 2 3 4 5 6 7 8 9 10 11 12 13 14 15 16 17 18 19 20 21 <script setup> import {useMoneyStore} from '../stores/money.js' let moneyStore = useMoneyStore(); function guaguale(){ moneyStore.win(100); } function bangbang(){ moneyStore.pay(5) } </script> <template> <button @click="guaguale">刮刮乐</button> <button @click="bangbang">买棒棒糖</button> </template> <style scoped> </style>
setup写法 1 2 3 4 5 6 7 8 9 10 11 12 13 14 15 16 17 export const useMoneyStore = defineStore ('money' , () => { const salary = ref (1000 ); const dollar = computed (() => salary.value * 0.14 ); const eur = computed (() => salary.value * 0.13 ); const pay = ( salary.value -= 100 ; } const win = ( salary.value += 1000 ; } return {salary,dollar,eur,pay,win} })
脚手架 这里已经整合好路由等
1 2 3 npm create vite # 选择 使用 create-vue 自定义项目 npm create vue@latest # 直接使用create-vue 创建项目 vue-cli #已经过时
Ant Design Vue 官网:https://www.antdv.com/
使用 npm create vue@latest 创建出项目脚手架,然后整合ant design vue
整合 安装依赖
1 npm i --save ant-design-vue@4.x
全局注册: 编写main.js
1 2 3 4 5 6 7 8 import { createApp } from 'vue' ;import Antd from 'ant-design-vue' ;import App from './App' ;import 'ant-design-vue/dist/reset.css' ;const app = createApp (App );app.use (Antd ).mount ('#app' );
然后后面根据官方文档来使用组件即可

